Define Objective properties
Before you begin
The OKRsignal widget must already be on your dashboard before you can define an Objective. If you haven't done this yet, see Add the OKRsignal widget to your dashboard first.
Required permissions
To open and save the OKRsignal configuration panel you must have:
- Basic ADO access level or higher (free Stakeholder accounts can view the widget but cannot open the configuration panel)
- Membership in the CXOsignal-OKR-Signal-Users Azure DevOps security group
- An active CXOsignal licence or trial
If you see a read-only widget with no Edit option, check that all three conditions are met. See Identify licensed users for how to set up the security group.
Open the OKRsignal configuration panel
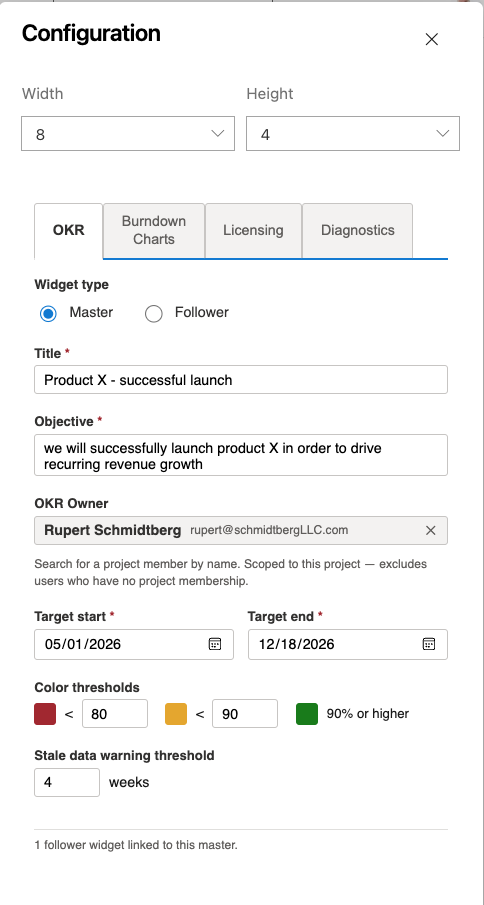
Hover your cursor in the top-right corner of the OKRsignal widget. A "..." menu will appear. Click it and select Configure. OKRsignal's configuration panel will open with the Objective tab selected.
Choose the widget type
At the top of the Objective tab, select the widget type using the Widget type radio control:
| Master |
The default. This widget owns the OKR data. All fields — Title, Objective, Key Results, Decisions, Notes, and Burndown Charts — are editable here. A grey footer on the widget shows how many Follower widgets are currently linked to this Master. Most widgets are Masters. Choose Master unless you specifically want this widget to mirror another. |
| Follower |
This widget displays a read-only copy of a Master widget's OKR. When Follower is selected, all standard Objective fields are hidden and replaced with a single "Link as follower of:" dropdown. Select the Master widget you want to mirror. The Burndown Charts tab is hidden on Follower widgets — Follower widgets use the same burndown settings as configured for the Master. Use Follower widgets to show the same OKR on multiple dashboards without duplicating data entry. See Show all OKRs on a single dashboard and Add the same OKR to multiple dashboards for common patterns. |
Switching Master to Follower
If you switch an existing Master widget to Follower after it already has Key Results, Epics, Issues, Decisions, Notes, Hierarchy links, or History, OKRsignal will warn you: "Switching to Follower will hide this widget's Key Results, Epics, Issues, Decisions, Notes, Hierarchy links, and History (they remain in storage and reappear if you switch back to Master). Any widgets currently following this one will become orphaned until their admin claims a new master."
Confirm the switch only if you intend this widget to become a read-only mirror. Any Follower widgets currently linked to it will need to be re-linked to a different Master.
If a Follower's Master is missing
If the Master widget a Follower is linked to is deleted or removed from its dashboard, the Follower displays the last known snapshot of the OKR. Recovery depends on your ADO role:
- Project Admin: Open any OKRsignal widget in the same project, switch it to Master, and check "Claim this instance as the new master" to restore the link.
- All other users: You will continue to see the last snapshot until a Project Admin claims a new master for this OKR.
Configure the Objective
Click the Objective tab and enter the following:
| Title | Enter a short OKR label — typically 3–5 words — that appears in the
widget header and identifies this OKR at a glance. Choose something
your team and stakeholders will recognise immediately. Examples: "Grow Enterprise Revenue", "Reduce Customer Churn", "Launch APAC Region" |
| Objective |
The full statement of what your team is trying to achieve. A
well-written Objective is ambitious, qualitative, and
self-explanatory. Use a "so that" clause to capture
the business reason behind the goal: For detailed guidance, see How to write an OKR. |
| OKR Owner | The person accountable for achieving the OKR. Click in the search box and select their name from the list — start typing to filter the list of selectable names. See The OKR Owner role for a full description of what this person is responsible for. |
| Target Start and Target Completion dates | For a strategic (multiyear) OKR, set these so that they are aligned with your strategic objectives. For annual OKRs — objectives intended to be achieved within a fiscal year and supported by your annual operating budget — set these to the start and end of your fiscal year. |
| Colour thresholds |
Coding used to provide visual alerts on the OKRsignal display. A starting point of <80% for red and <90% for amber is typical. For detailed guidance, see Setting Targets. |
| Stale data warning threshold |
Typical values are:
|
Configure the Burndown Charts tab
Click the Burndown Charts tab at the top of the configuration panel. This tab controls how OKRsignal calculates the average team velocity used to forecast Epic and Feature completion dates. Set the following:
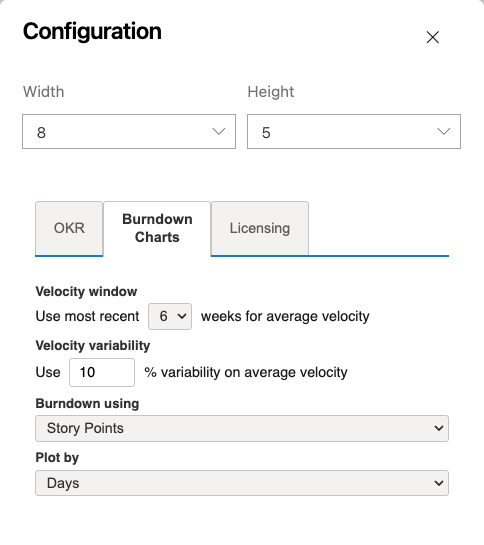
| Velocity window | "Use most recent N weeks for average velocity" — the number of recent weeks OKRsignal will use to compute the team's average velocity. This velocity is used to forecast the optimistic and pessimistic completion dates. |
| Velocity variability | "Use N % variability on average velocity" — the percentage spread applied above and below the average velocity to produce the optimistic and pessimistic completion dates shown on the burndown chart. Choose between 1 and 50 (default 10). Use a lower number for teams with very consistent velocity — this produces a tight forecast window. Use a higher number when velocity varies noticeably sprint to sprint — this produces a wider, more conservative forecast window. |
| Burndown using | The Azure DevOps field that holds your team's size estimates. Choose Story Points (Agile process, default), Effort (Scrum process), or Size (CMMI process). OKRsignal reads this field on every leaf work item under each connected Epic to compute total scope and remaining work. |
| Plot by | The x-axis granularity of the rendered burndown chart. Days is more informative for short-running Epics. Weeks is easier to read for Epics running longer than one quarter. |
These settings apply to all burndown charts for this OKR. For a full explanation of how the forecast dates are calculated, see Epic completion forecasts.
Click Save
Click Save at the bottom of the configuration panel. The panel closes and the widget refreshes to show your Objective name, dates, and an empty Key Results section. The next step is to add Key Results.